Just to say some of the items in my files may be hidden (such as the copied spline cage for the hair).
Thank you
Friday, 9 December 2011
Using Morpher
To use morpher with my hair spline cage in the scene kept causing 3DS Max to crash and so I deleted my hair and created 3 copies of my head model and using the morpher modifier on the original head I was able to create three different movements on the face. I opted for an open mouth, raised eyebrows and an attempt at a smile. Unfortunately just before I turned my original model into an editable poly, I forgot to reselect the turbo smooth option and unfortunately the short animation I ended up with has lost the lifelike feel. However I am pleased with this experiment with morhper and hope to redo it using the turbo smooth and sorting out the other problems with the movements.
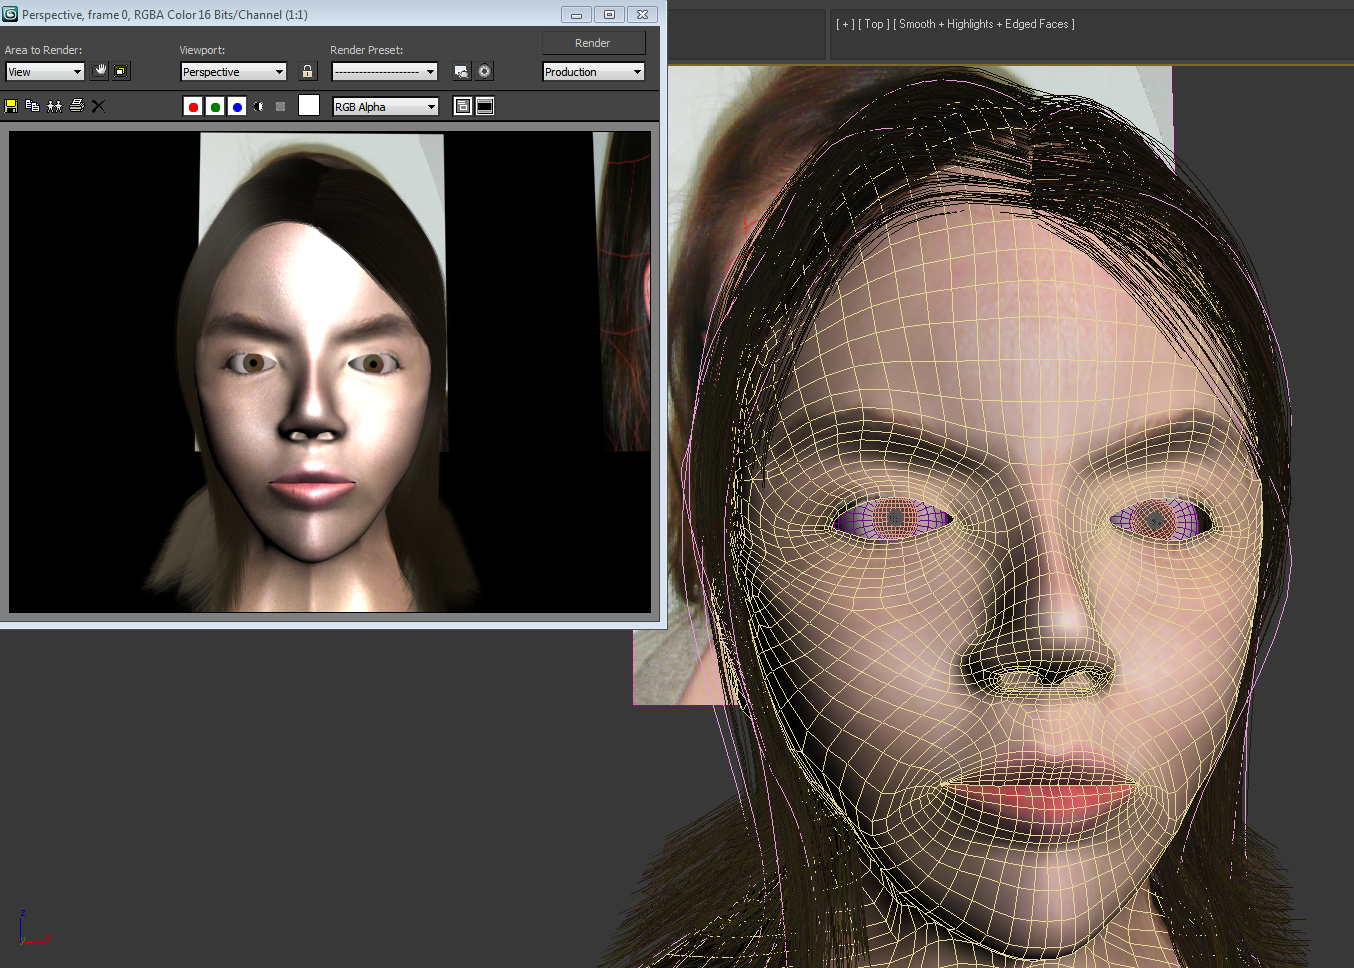
One issue to mention is that when rendering the final submission with the hair in view the render does take a very long time. I have had to resort to rendering my final image without hair due to the length of time it takes, please see earlier blog posts for rendered pictures with the hair!
Unfortunately I no longer have the Original images, please refer to my previous hand in, Thank you.
Unfortunately I no longer have the Original images, please refer to my previous hand in, Thank you.
Rendering Time
Each time I tired to render my model from adding the eye constraints I came across incredibly slow rendering times as you can see below it took 45 minutes to render just one scene and I am not entirely sure why, assuming that it has something to do with the amount of information in the scene since I had also added a light within the scene.


This is my model at a much better state than previously although as I said I would particularly like to work more on it and perhaps begin another just to improve my skills.

Hair Again
So I was happier with the look of my model and the major problem for me was the hair not looking very realistic and so I tried a couple of techniques so improve it - firstly the hair and fur modifier put directly onto the head model. This I found quite tricky to gage what shape my hair would take if I had had an electric shock!

I then came across a couple of youtube videos displaying hair spline cages used in conjunction with the cloth modifier to create an animated hair style. Unfortunately although I could find plenty of examples of great hair on 3d models I couldn't find any tutorials to help me out. Instead I had a go at trying for myself.

I managed at least to create a flannel on the head look!
I then cam across a blog that suggested attaching the cloth modifier to the actual spline cage itself. It said to create a copy and manipulate it this way and then use skin mapping to allow it to affect the original spline cage.

The main issue with this was that that was all the blog said and I got stuck at this stage. I managed to create a nice flow within the copied spline cage when simulating locally although when it came to skin mapping I got very lost! I hope to carry on with this model and get it to a better stage, since after working within the Finchingfield project I have found an enjoyment in organic modeling!

Correcting the Issues
Wow it seemed like such a long time ago I was looking at this model. Time away has been beneficial I think considering I can now look at my model and see just how flawed it is! To start with I began pulling out the vertices around the jaw and cheek areas. My model was rather thin and needed filling out a lot and also the egg head needed to go!
I had a few disasters with the UVW mapping and so I made full use of my friend Autoback!
After playing with the actual head model to make it more lifelike I had another go at the eye which was slightly more successful than before to say the least!


I had a few disasters with the UVW mapping and so I made full use of my friend Autoback!
After playing with the actual head model to make it more lifelike I had another go at the eye which was slightly more successful than before to say the least!

I watched a couple of youtube tutorials and remade the model of the eye using some of the techniques I had picked up on modeling the Finchingfield animation. I created a white, inverted iris, pupil and cornea.
I then added materials, manipulating the specular for the white of the eye, using UV map for the iris bitmap (which I used a lot in the group project!) I also gave the pupil self-illumination so that it did not reflect the light source that I placed in the scene and made the cornea transparent.


When placing the eyes back into the head I realised that put them into the correct position I needed to significantly alter the eyelids. I did this and quickly ran into the issue of not having a eyelid 'lip' on which eyelashes sit. I tried to modify the head model but of course the UVW mapping was affected and so as a way around this issue I created a separate eyelid lip, connecting it to the eye via the vertex snapping tool and also added turbo smooth to that so that it fit perfectly against the head model.

This is how the eyes looked in the end

I also toned down the specular map in photoshop by adjusting the opacity of the highlights I had created. Just these small but significant changes made a dramatic change to my model.


After making the eyes look a little better I then added a lookat constraint onto each eye so that I could manipulate them independently and together to achieve some animation in the face.
Friday, 21 October 2011
Finally let's sort out that barnet!
Likewise with the eyes, hair is another feature that I have not yet modeled in 3DS Max. I hope to follow one of Studio Max’s own tutorials for this (I had learnt my lesson after the eye debacle!). The technique I decided upon using was to use the hair and fur modifier, attaching the hair to predrawn splines. I had assigned the hair and fur modifier to see what effect it had but this threw me a little (see below) and I decided that my best bet was to be deciding where the hair was to go before it went anywhere near the model.

These are images depicting my process in following the 3DS tutorial;

I created splines, like in the main model that connected to faces of the model. I selected view in active viewport so that they would be easier to see and manipulate.

Placement of the splines


Here you see the final Spline hair cage ready to be adorned with hair!
Next I added the Hair and Fur modifier, setting the hair count to 3000, segments to 100 and passes to 2. I changed the colour of the roots and tips and also manipulated some of the other options, checking the result in the render window to create the effect I was after. I also needed to go into the edit poly mode of the hair cage and manipulate some of the vertices into the correct positons to make the hair fall a bit better, which the following images depict. Whilst in the edit poly mode on the hair cage I noticed a few places I wanted to manipulate on the main head model also and so I went into the edit poly section of the main head and moved some of the offending vertices, such as again near the temple, removing unsightly bags under the eyes and around the neck. I took care not to change the head too drastically so as to alter the mapping too much.


The glossiness and spec values on this trial were a little high.

Here the hair looked too thin over the ear and so increased the hair count to counteract this

Still not quite happy with the hair and also the chin looks too narrow.
Finally I had a model that had a rough hairstyle similar to that in my original reference pictures, and also a finished head to match.
Virtual Polly
Eyes
Having never modeled an eye before I am just going to try my luck and see how it turns out as I really want to get onto the hair modifier as personally I think this will make more of an impact on my model if I run out of time.
Here are images depicting how I created the eye;

Firstly I created a sphere and flattened one of the sides for which to attach the Iris and the pupil to. I then created the flattened sphere required for the iris.

Originally I had planned to select an eye bitmap from the Internet although I thought the for continuity’s sake I should use my own eye, or the iris colouring at the very least to match my eyes as closely as possible. As I said, this was my first time modeling an eye and perhaps in retrospect I should have researched a tutorial for this particular task.

I cut apart the eye image from my original reference photos and extended the white area of my eye and left a little pink around the edges for realism. I then tried to assign this bitmap as a material to the larger of my two spheres. This was problematic. The iris was stretched and distorted across the side of the sphere, with a gap at the back where the bitmap didn’t meet. I tried to rotate the iris into the correct position within the material editor, which was not as easy as I’d hoped creating the effect you see below, and so I tried a different tack.

I decided to cut the original image so that I had the iris and the white of my eye as separate Photoshop files. I then (using the clone stamp tool) enlarged the area of colour so that I could use it to fit onto my objects in 3DS Max as a material. Similar issues occurred as before although due to the bitmaps being largely one colour it wasn’t so imperitive to reduce stretching or requiring specific placement of images on the object. I added a pupil in the same manner and this is the end result of my quick fix eyes.


The eyes do bring the model alive a little more although if I have enough time at the end, they will be my number one priority to work on some more and to achieve a more realistic look.
Subscribe to:
Posts (Atom)